
Connect an OIDC or OAuth2 identity provider, step by step
This page walks you through connecting an OIDC provider (Microsoft Entra ID, Okta, Google Workspace, Keycloak, JumpCloud, Auth0, GitLab, or a Generic OIDC provider) or an OAuth2 provider (GitHub, or a Generic OAuth2 provider) end to end. You do all of it in the portal. There is no command line to run: you fill a form, the engine builds and validates the connection server-side, and a signed-in person lands back in the console.
Who can create a connection
It is written for an owner. Connection management is reserved to the owner-exclusive keys.ceremony capability. Creating a connection is high-blast.
With the four-eyes/dual-control setting off, creating one needs a second owner’s approval once your organisation has a second owner, unless you are signed in with the bare admin-token break-glass, which is exempt from that second-owner rule and creates immediately (the escape that lets the break-glass wire the first connection before any second owner exists). Turning that setting on goes further and queues every creation for approval unconditionally, even with a single owner, which leaves no one to approve it; there the break-glass cannot propose a creation at all and can only disarm the setting again to escape. So a connection is created immediately on save only when the setting is off and either your organisation still has a single owner or you are using the bare admin-token break-glass. For a SAML provider, follow Connect SAML instead. For the bigger picture, including the no-custody model and the scope limits, read the SSO overview first.
Before you start
You will need a few things from your provider, and a clear idea of which secret mode you are using.
| You need | Why |
|---|---|
| An application (client) registered at your provider | downpipes signs in as that application |
| The client id it issued | Goes in the form; pins the audience the engine checks |
| Either a client secret, or a public client | Decides which of the two secret modes you pick (see below) |
| The redirect URI from this flow, registered at the provider | The provider will only return to a pre-registered URI |
| For group mapping, the provider’s groups or roles claim | Lets the engine carry membership into role mapping |
There are two secret modes that actually work, and you choose between them on the form. A public client uses PKCE with no secret at all, and it is available on the OIDC providers only. A confidential client uses a write-only secret that the engine stores and never shows again. Cloudflare Secrets Store and private_key_jwt appear in the underlying type, but the engine does not support them, so the console does not offer them: the engine rejects a connection on either mode at save time, before anything is written to storage, so it can never be saved only to fail later at first login.
Pick a working secret mode
Use Public client (PKCE) or a write-only client secret. Do not try to wire Cloudflare Secrets Store or private_key_jwt: the engine rejects the connection at save time, with the reason shown verbatim, so it is never stored in a state that would only fail at sign-in.
Connect the provider
Open the identity providers screen
In the console, go to Identity providers (the route is
/access/idp). The screen states that single sign-on is optional and shows a grid with one tile per provider, marking the ones you have already connected as Active or Off. If the available tiles read “Owner” rather than “Add”, you are not signed in as an owner: connection management needs the owner-exclusivekeys.ceremonycapability.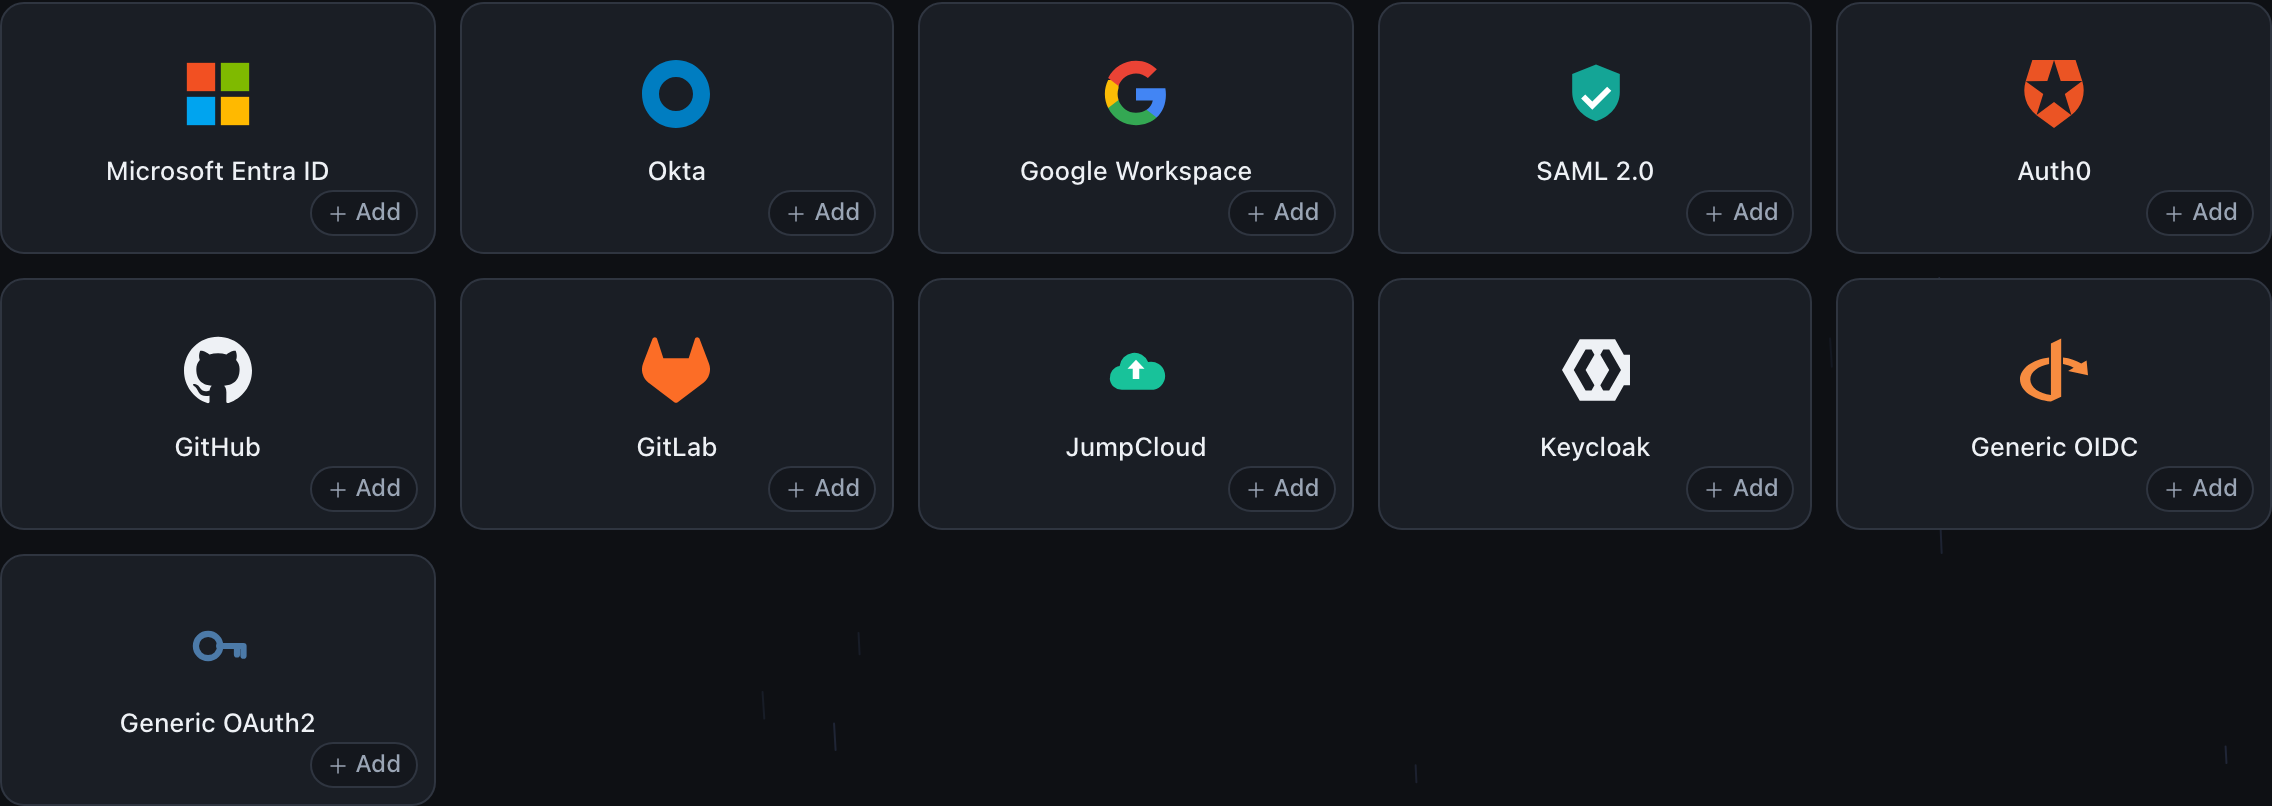
Open your provider's tile
Click your provider’s tile in the grid. A named provider (Entra, Okta, Google, Keycloak, JumpCloud, Auth0, GitLab, GitHub) opens a form built from that provider’s preset, which supplies its endpoints, scopes and claim names, and an inline “How to add X” guide with the exact field names to set at the provider. If your provider is not shown, open the Generic OIDC tile for any spec-compliant
.well-known/openid-configuration, or the Generic OAuth2 tile for an OAuth2 provider with no ID token.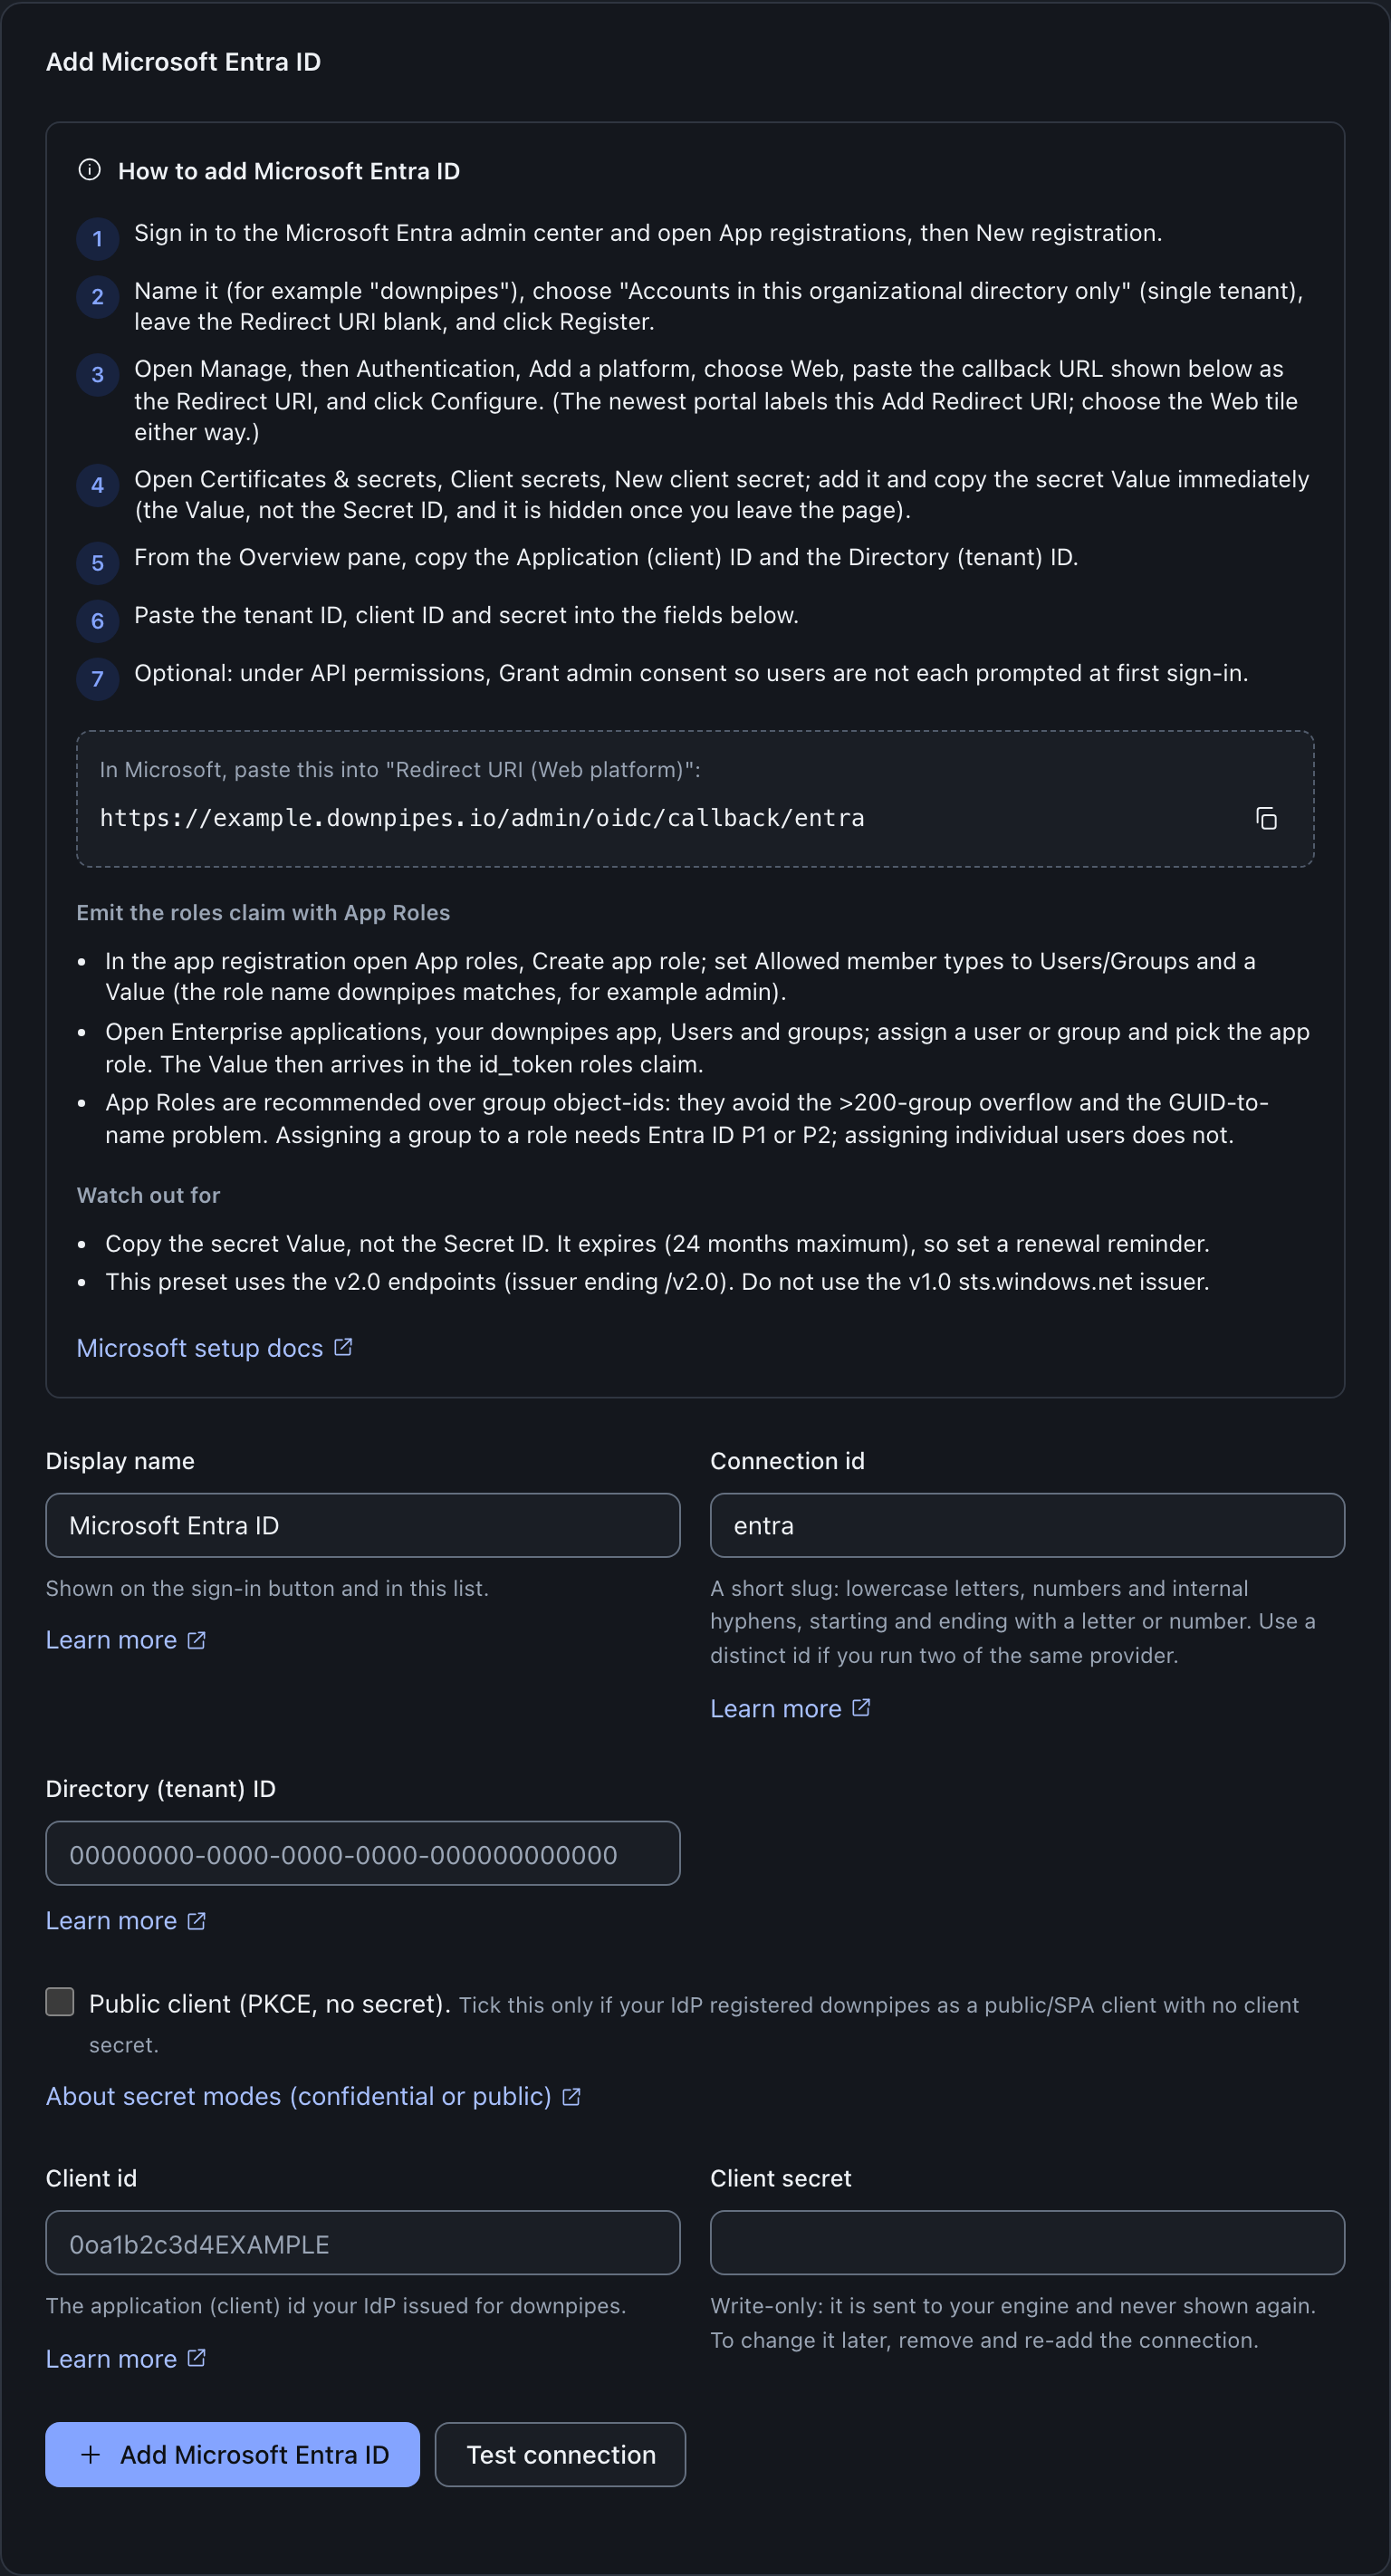
Set the connection id, then copy the redirect URI it shows
Give the connection a display name and a short connection id (1 to 64 characters of lowercase letters, numbers and hyphens, and it must not start or end with a hyphen). The id matters: the redirect URI is built from it. The form shows the live callback URL to register, which is your own console origin plus
/admin/oidc/callback/<connId>, for examplehttps://console.example.com/admin/oidc/callback/entra. Register that exact value at your provider as its redirect URI (or callback URL). It must match byte for byte, because the engine echoes the same value into the token exchange.Fill the values the form asks for, and the client id
Enter the provider-specific values the preset asks for (a tenant id for Entra, an Okta domain and authorisation-server id, a Keycloak host and realm, an Auth0 domain, and so on) plus the application (client) id your provider issued. The form requires a value in every field the preset marks required, but a group or role claim-name field that the preset labels optional stays optional: you can leave it blank and save a sign-in-only connection. Sign-in itself does not depend on a groups or roles claim: the engine treats it as optional and uses it only to carry directory membership into group-to-role mapping, and it treats a missing claim as no groups rather than a failure. So enter the claim name your provider emits (for example
groupsorroles) if you want group-to-role mapping; leave it blank for sign-in only, and mapping simply stays empty until you set it. The inline guide calls out the per-provider gotchas, for instance that Google’s hosted-domain gate is mandatory, or that Keycloak must be told to put roles and groups in the ID token. From engine 0.3.6, the Generic OAuth2 form also has six optional fields: scopes, Email URL, Email field, Email-verified field, Groups URL and Group name field. Sign-in needs an email address, so fill the Email URL. Generic OAuth2 explains each of these fields.Choose your secret mode
For a confidential client, type the client secret into the Client secret field. It is write-only: it is sent to your engine, stored in a separate write-only key, and never shown again (to change it later, remove and re-add the connection). For a public client on an OIDC provider, tick “Public client (PKCE, no secret)”, which hides the secret field and flips the connection to the PKCE-only mode. Tick it only if your provider registered downpipes as a public client with no secret. An OAuth2 provider, GitHub or Generic OAuth2, is confidential on this path: the form shows the same tick but disables it, with a note that your engine will not save an OAuth2 connection without a client secret. Enter the client secret instead.
Run Test connection
Test connection runs the engine’s read-only probe. It stores nothing and starts no login. From engine 0.3.6, the engine builds the connection from the values in this form before it probes, so you can test before you save. For an OIDC provider, the probe checks discovery and JWKS reachability. For an OAuth2 provider, the probe checks that the authorisation, token, profile and API base URLs are usable https URLs, and it warns that the exchange first runs at sign-in. From engine 0.3.6, it also checks the email URL and each groups URL. It fails when the email URL is empty, because sign-in needs an email address. It does not call these endpoints.
Save the connection
Select Add (the button is labelled “Add” followed by the provider name, for example “Add Microsoft Entra ID”). With the four-eyes/dual-control setting off, once a second owner exists the create runs through the owner gate: a second owner approves it before it is stored, unless you are signed in with the bare admin-token break-glass, which is exempt and creates immediately. Turning that setting on queues creation unconditionally, even for a lone owner, so an owner who arms it alone has no second owner left to approve it and must use the bare-token break-glass to disarm the setting again. It is created immediately on save only when that setting is off and either your organisation still has a single owner or you are using the bare admin-token break-glass. Any validation refusal from the engine is shown to you verbatim, so you can correct it. A preset-built connection is enabled the moment it is created (or approved): its “Sign in with X” button appears on the sign-in screen straight away, with no separate enable step.
What the redirect URI looks like
The callback URI is always your own console origin followed by the OIDC callback path and the connection id. The router builds it from CONSOLE_ORIGIN, so the value the form shows and the value the engine uses are the same.
| Field | Value |
|---|---|
| Pattern | https://<your-console-origin>/admin/oidc/callback/<connId> |
| Example | https://console.example.com/admin/oidc/callback/entra |
| Where to register it | Your provider’s redirect URI / callback URL field |
| Must it match exactly | Yes. It is echoed into the token exchange and compared |
Use your own console origin, never a different host. The example above uses a custom domain on purpose.
What OIDC sign-in does under the hood
Knowing the flow helps you read a test failure. An OIDC sign-in is an authorisation-code flow with PKCE, and the ID token is verified hard.
How the ID token is verified
The verifier chooses the signing algorithm from the connection’s allowlist and the matched key’s type, never from the token header, which defeats alg:none and algorithm-confusion attacks. It matches the issuer exactly against the connection’s configured issuer (with bounded, explicit exceptions for Entra multitenant and Google’s two issuer spellings), requires the audience to include your client id, requires azp to equal your client id when an azp claim is present or the audience is multi-valued, and requires the single-use nonce to match. The accepted algorithms are a closed set of RS256 and ES256.
Where the engine will and will not fetch keys from
Every call the engine makes to your provider, discovery, the JWKS key fetch and the token exchange, goes through one screen before the request leaves. The URL must be https, it must not be an IP literal, and it must not be localhost or a .localhost name, so a tampered issuer cannot point the key fetch at an address inside your network. From engine 0.3.6, the engine also resolves the host name before each call. It refuses the call if an answer is a private, loopback, link-local or metadata address. A second host classifier catches the forms an IP-literal check alone would miss, such as IPv6 unique-local and link-local addresses and their obfuscated spellings. Redirects are never followed: a discovery, JWKS or token endpoint that answers a 3xx is refused rather than chased, so a 302 towards a metadata address such as 169.254.169.254 or a private range cannot steer the fetch off your provider. The response body is then read with a hard byte cap, so a hostile or compromised provider cannot exhaust memory before anything is parsed.
How OAuth2 (GitHub-class) differs
A GitHub-class connection has no id_token. The engine never verifies a token signature and never calls the ID-token verifier. Instead it exchanges the code at the token endpoint over the screened fetch to obtain an opaque access token, then makes a userinfo call with that token to read the immutable user id (a numeric or string id, never the renameable login) and folds it into a stable subject. Email and group membership are optional extra calls. OAuth2 reuses the same start and callback routes as OIDC; only the verification model differs.
OAuth2 does not verify a token signature
For GitHub and Generic OAuth2 there is no signed token to check. Trust comes from the TLS-protected token exchange, and identity from the authenticated userinfo call keyed on the immutable id. The access token is used only as a bearer credential against the provider’s own API; it is never decoded as a claim source.
When sign-in fails
The sign-in flow fails generically on purpose: the failure landing carries no detail of which check failed, so there is no oracle for an attacker. Test connection on the connection’s card is therefore your main diagnostic, because it returns a per-check result. A few common causes:
| Symptom | Likely cause | Fix |
|---|---|---|
| Test fails on discovery or JWKS | Wrong issuer, or an unreachable endpoint | Recheck the preset’s required values; confirm the issuer is exactly as the provider publishes it |
| Save is refused with a secret-mode reason | You picked Secrets Store or private_key_jwt, which the engine does not support | Rebuild it as Public client (PKCE) or a write-only client secret |
| Sign-in returns to a failed screen | The redirect URI at the provider does not match | Register the exact callback URL the form shows, including the connection id |
| Signs in but carries no groups | The groups or roles claim is not emitted into the ID token | Follow the preset gotchas (for example, toggle the claim into the ID token at the provider) |
Next steps
Group-to-role mapping
Map the groups your provider asserts onto downpipes roles so access follows your directory.
Roles and capabilities
The exact power each role carries, applied the same way however a person signs in.
Connect SAML
Connecting a SAML 2.0 provider instead, with its signing certificate and SP metadata.
SSO overview
The no-custody model, the provider menu and the scope limits, in one place.
Last updated .