
Set up a downpipe with multiple destinations for failover
Attaching two or more destinations to a downpipe is how you get redundant off-source copies and failover. If the destination a run would normally seal to is down, the run still lands on a healthy one rather than failing outright. This page is the step-by-step task for an operator: add destinations, tick more than one on a downpipe, and understand what each destination receives and when.
The one expectation to set up front: copies fill in shortly after a run, not during it. A run seals to a single destination and then a scheduled pass replicates it to the others, so a freshly run fan-out downpipe legitimately shows fewer than its full copy count for a short while. That is normal and self-correcting.
Before you start
Add your destinations first. A downpipe can only fan out to destinations that already exist, and the engine verifies each destination with a live write probe before it stores it, so a destination that is not reachable and writable never becomes one you can attach. Destinations are managed in one place (the Destinations screen), separately from downpipes, because a destination is an account-level archive target that any downpipe can use.
You need two or more destinations configured before the picker offers a choice. With a single destination there is nothing to pick, so the downpipe editor just shows where backups go and links you to Destinations to add another.
If your engine was deployed with a destination already bound in wrangler.toml (the common self-host starting point: one R2 bucket bound at deploy time, no destination set from the console yet), the Destinations screen shows that binding as a single posture card rather than an empty list. Add a destination in the header still works from here: it opens the same card’s Replace from the console disclosure, and it asks for the same thing the setup form always does: an R2 API token key pair (or equivalent S3-compatible credentials) for the bucket you are adding.
“Replace from the console” adds; it does not repoint your runs. The disclosure’s name describes what it replaces on the deploy side (a wrangler binding for a console-stored credential), not what happens to the runs already sealed to that bucket. The first time you add a destination this way, the engine registers the deploy-time binding as a real, permanent destination in its own right, keeps it as the default, and every run it already holds stays recorded against it. Your new destination joins alongside it; nothing already sealed is reassigned, and the Destinations screen lists both from then on. New runs keep sealing to the deploy-time bucket until you explicitly promote the new one with Make default, and removing either one still runs the same 3-2-1 guard as any other destination: a removal is refused while it is the only proven copy of a backed-up run, naming the count.
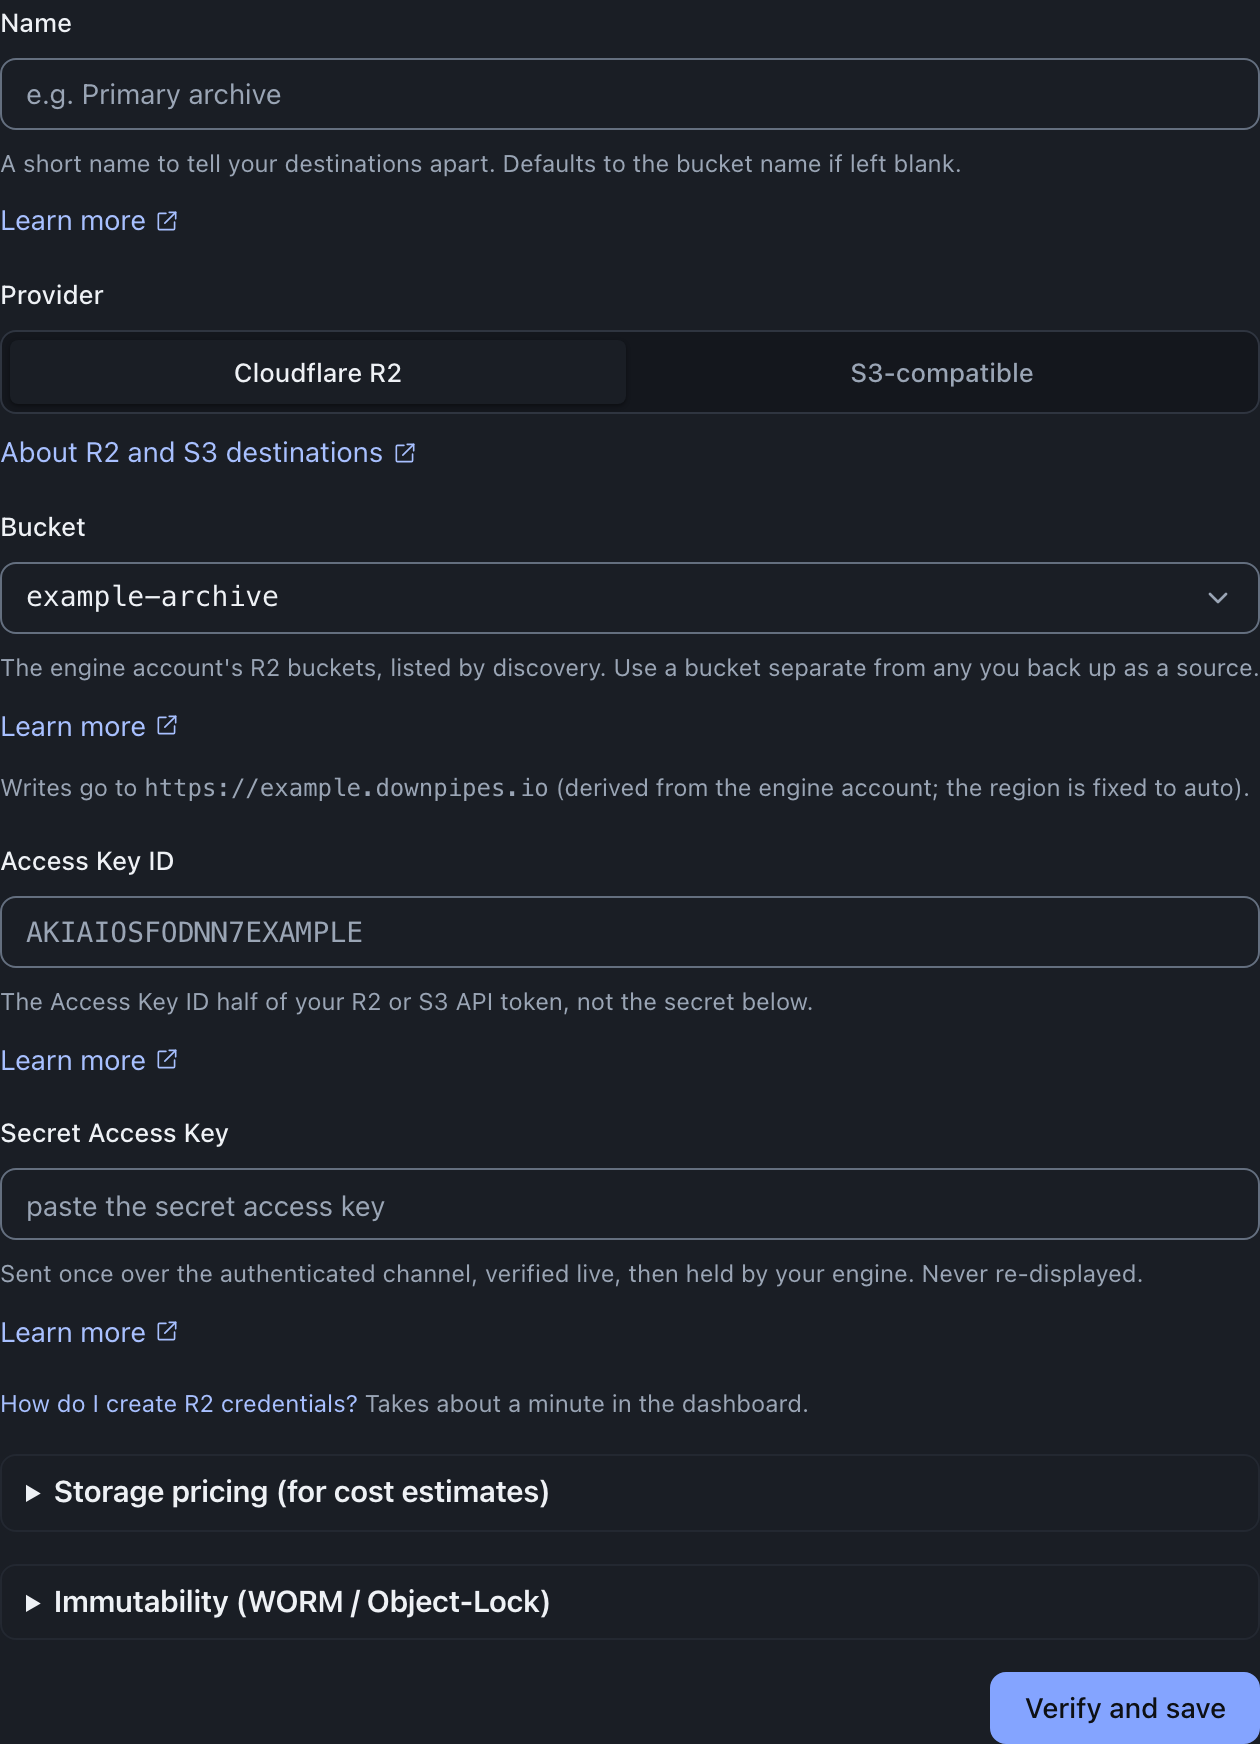
The form has four providers
The form offers four providers: Cloudflare R2, S3-compatible, Google Cloud and Azure Blob. What each one changes about the form is one row each in destination providers compared. The R2 branch also carries a This bucket is in a different Cloudflare account tick that reveals an Account ID field, described in the next section.
Putting an R2 bucket in a different Cloudflare account
By default the R2 form offers the buckets discovery found in the account the engine runs in, and derives the write endpoint from that account, so there is no Account ID to type. That is the common case and it stays the default.
A second copy in the same Cloudflare account is not a second blast radius, so the form also lets you point a destination somewhere else. Tick This bucket is in a different Cloudflare account and two things change: an Account ID field appears, and the bucket stops being a picker and becomes a text box, because the list you were choosing from describes the engine’s account and not the one you are now naming.
Fill both. The Account ID is the 32-character id shown in the right-hand column of that account’s R2 page in the Cloudflare dashboard, and it becomes the endpoint host <account-id>.r2.cloudflarestorage.com; the bucket name is typed exactly as that account’s dashboard shows it. The access key pair must be an R2 API token minted in the same account, not in the engine’s. The form restates the endpoint the writes will actually go to as you type, so you can check it before saving.
Leaving the tick on with the Account ID empty is refused at the form. It never falls back to the engine’s account, because writing into the one account you have just said you did not want is the mistake the tick exists to prevent.
Naming a destination
Each destination carries a short name so you can tell your destinations apart. It shows up in the Destinations list and in the destination picker when you attach one to a downpipe. It defaults to the bucket name if you leave it blank. The name is a label only and does not change where backups are written. You can change it later by editing the destination, but editing re-verifies the destination with a live write probe, so it asks for the access key pair again; because the secret is never shown back to you, mint a fresh key first if you did not keep it.
Attach two or more destinations
You can set the destinations either when you create a downpipe in the wizard, or later by editing an existing one. The control is the same in both places: a list of tickboxes, one per destination.
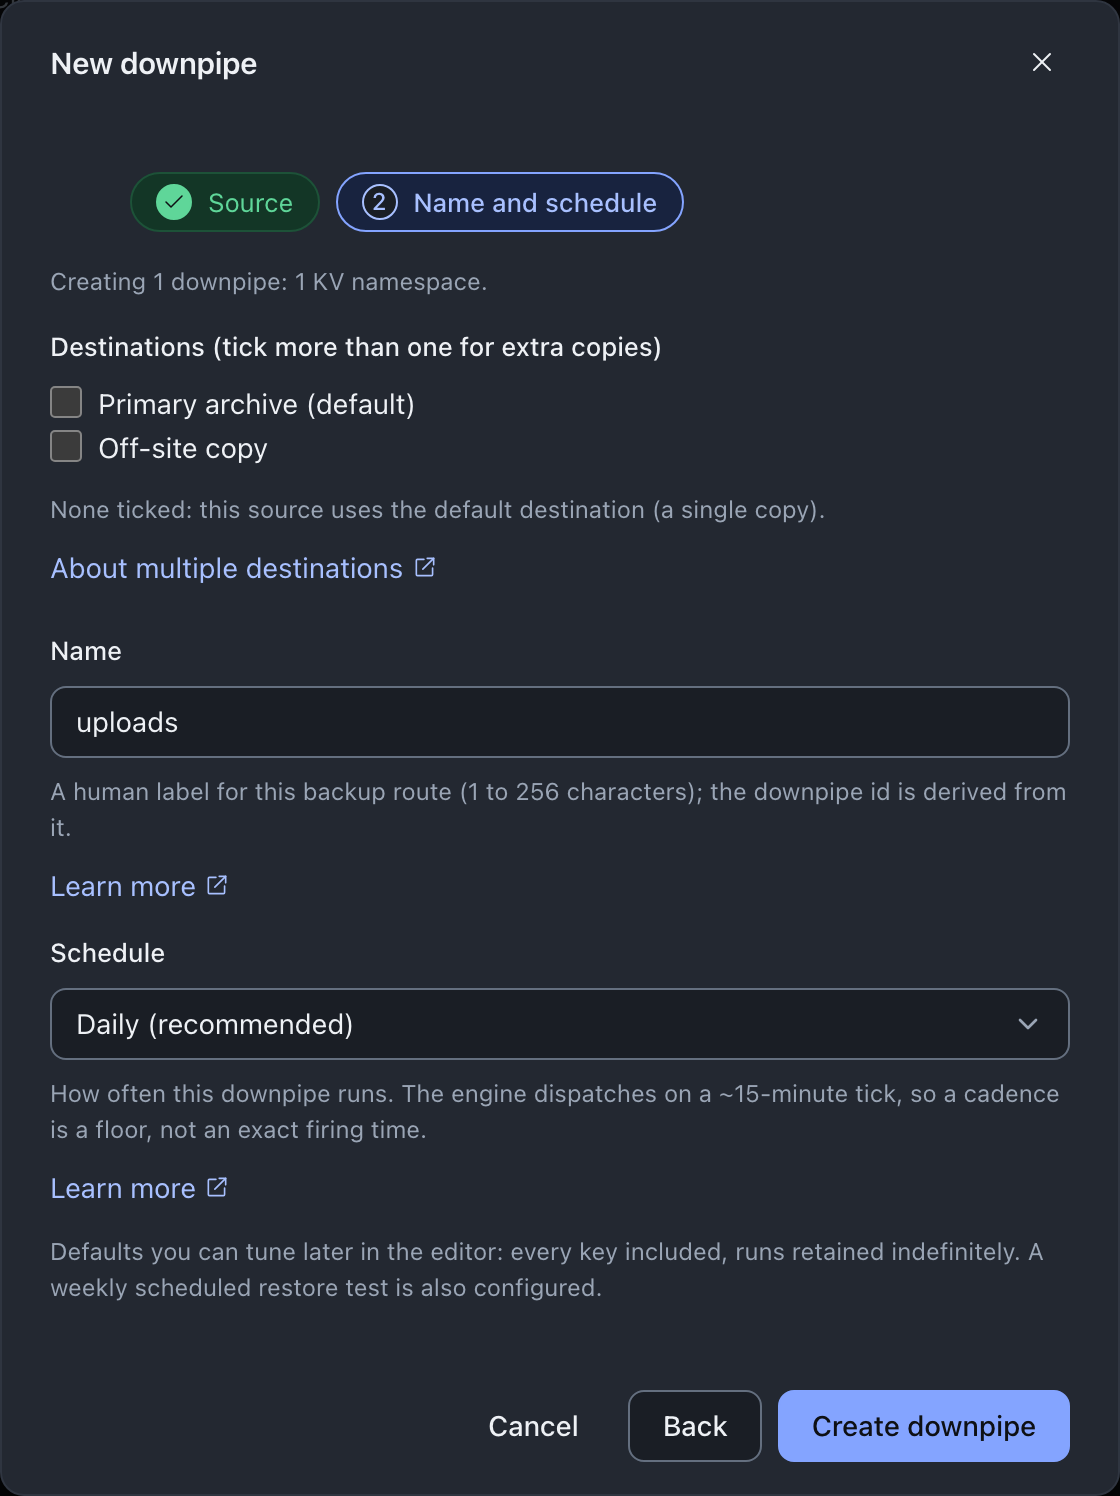
Open the destination picker
In the new-downpipe wizard, the picker appears on the step where you name the downpipe and choose where it goes. In the editor, it is the “Destinations” field. Both are labelled so you can tick more than one for extra copies.
Tick two or more destinations
The first destination you tick is the primary the run seals to. Each of the rest receives a copy of every run. A live summary line tells you what your current selection means (for example, “3 destinations: the first ticked is the primary; the rest each get a copy of every run”), and the default destination is labelled. After you save, the downpipe’s detail view marks the first ticked destination with a “primary” badge and each of the others with a “copy” badge.
Check the ordering
Tick order is the selection order: the first ticked is index 0, the primary. When you edit an existing downpipe, the picker renders your current selection first, in its stored order, so an unrelated edit (a rename, a cadence change) never flips which destination is the primary.
Save
On save, the console assembles the ticked destinations into an ordered list and sends it to the engine, which checks every id is a live destination before accepting the change. Leaving every box unticked clears any pin and falls back to the account default, a single copy.
What the badges mean
| Badge | Position | What that destination does |
|---|---|---|
| primary | First ticked (index 0) | The run seals here first. Under failover, if it is down the run seals to the next reachable destination instead. |
| copy | Each subsequent ticked destination | A scheduled replication pass copies every finalised run here from its origin. |
| default | Marked on whichever destination is the account default | The destination a downpipe uses when you pin nothing. Informational; it can also be ticked as primary or a copy. |
Each destination also carries a provider badge, derived from its endpoint host rather than from anything you typed: R2 for a Cloudflare R2 endpoint, GCS for Google Cloud Storage, Azure for an Azure Blob endpoint, and S3 for every other store (providerKind and PROVIDER_BADGE, console/src/screens/destination-cards.ts). The derivation mirrors the engine’s own providerForEndpoint, so the badge names the store the bytes actually go to rather than the button that configured it. R2 reads as in-account; the other three are outside your Cloudflare account. Every badge reads neutral: none is presented as preferred, because the choice that matters is off-account with Object Lock enforced, not which of the four buttons you pressed.
When you are choosing which ticked destination should be the primary, put the off-account, Object-Lock-capable one first. R2 cannot enforce Object Lock on any bucket and shares this account’s own credential and blast radius with the sources it protects, so an all-R2 fan-out gets you redundant copies without a copy an account compromise cannot also reach. The console names this gap directly: a calm note on the Destinations screen fires whenever no destination you hold is both off-account and Object-Lock enforced with a retention window. That note is described in the posture score’s 3-2-1 distinctions. R2 stays a valid destination and a good secondary or replica leg.
What is sent and stored
The form assembles a destinationIds array. Index 0 is the primary, and the remaining entries are the replicas. The wire shape looks like this when two destinations are ticked.
{
  "id": "kv-prod-backup",
  "name": "Production KV",
  "cadenceSeconds": 3600,
  "enabled": true,
  "source": { "type": "kv", "binding": "KV_prod", "include": [], "exclude": [] },
  "destinationIds": ["dest-1a2b3c4d", "dest-9f8e7d6c"]
}| Field | Meaning |
|---|---|
destinationIds[0] | The primary destination id. The run seals here first (or to the first reachable destination after it, under failover). |
destinationIds[1..] | The replica destination ids, in order. Each receives a copy of every finalised run on a later pass. |
destinationIds absent | No pin. The downpipe follows the account default, which is a single copy with no redundancy concept. |
A downpipe can carry a single destinationId in place of destinationIds. The engine resolves the primary from destinationIds[0] when it is present, then from destinationId, then from the account default. Editing the downpipe in the console and ticking a second destination saves it as destinationIds.
How destination credentials are held
A destination needs a credential to write to your bucket, either an S3-style access key or a role to assume. That credential is yours and is stored in your own account, never with the vendor. Two engine settings tighten how it is held at rest.
| Setting | What it does |
|---|---|
CONFIG_WRAP_KEY | A 32-byte key, held as a Worker secret on your engine. With it, the engine envelope-encrypts each stored destination credential with AES-256-GCM, so the Durable Object holds an opaque ciphertext rather than the credential in clear. The same key encrypts the other credentials the console stores: the read-only discovery token, the SIEM and OTLP push secrets, the JSM and ServiceNow keys, and identity provider client secrets. Both key ceremonies set it from engine 0.3.6 and console 0.2.7, and an engine keyed earlier by the console can add it from the Keys screen. With no wrap key, a plaintext credential keeps working. When the console’s key install, or the Keys screen’s add, puts the key in place, the engine encrypts each of those credentials that it already stores without encryption, and reports how many (rewrapAfterKeyInstall, engine/src/admin/config-rewrap.ts). A key set outside the console, with wrangler secret put, runs no such pass: there, each credential stored before the key is encrypted the next time you save it. Setup’s receipt asks you to save them again whenever the engine did not report encrypting them. The posture score’s destination-credential-encryption check reports whether any destination credential is still unencrypted. |
| STS AssumeRole | For an AWS destination the engine can assume a role and mint short-lived credentials for each run rather than signing with a long-lived key. The region is validated against an allow-list before any call and the resolution fails closed, so a misconfigured role refuses the write rather than falling back to a broader credential. A long-lived principal key is still stored to perform the assume, so this narrows the lifetime of the per-run credential rather than removing every stored secret. |
Creating the destination credential
A plain S3-compatible destination authenticates with an access key id and a secret access key. You mint that pair in your storage provider’s own console, not in downpipes. For AWS S3 that is IAM: create (or reuse) an IAM user, then create an access key under its security credentials. For Cloudflare R2 reached over its S3-compatible endpoint it is an R2 API token. For another S3-compatible store, such as Backblaze B2, Wasabi or MinIO, it is that provider’s equivalent application-key or access-key screen. Whichever it is, the credential stays yours, in your own account.
Scope the key to the one archive bucket, and grant it the operations the engine actually performs against that bucket. On AWS these are the IAM actions below.
| Capability the engine uses | AWS S3 action | Why |
|---|---|---|
| Write objects | s3:PutObject | Seal each run’s segments and manifests into the archive. |
| Read objects | s3:GetObject | Read the archive back to verify at seal, and to restore. |
| Delete objects | s3:DeleteObject | Prune a superseded run under your retention policy, and clean up the save-time write probe. |
| Abort a multipart upload | s3:AbortMultipartUpload | Cancel a large-segment upload that failed, or the upload the engine replaces when the bucket requires a checksum. Without it the backup still completes, but the parts stay in the bucket, and the support pack counts each stranded upload. |
| List the bucket | s3:ListBucket | Enumerate keys for the replication sync and for prune planning. |
| Read Object-Lock configuration | s3:GetBucketObjectLockConfiguration | Read on every save-time destination probe, whether or not you use immutability, so the engine can report live enforcement. Without it the save still succeeds: the Object-Lock verdict degrades to unknown with a recorded reason; the probe does not fail and does not report green. |
One trap is worth calling out. The save-time write probe exercises read, write and delete, so a key missing s3:ListBucket still passes the probe, then fails later when the replication sync or a prune needs to list the bucket. Grant list up front so a key that verifies at save keeps working on every later pass.
To assume a role you paste its Role ARN, the Amazon Resource Name of the IAM role the engine assumes, in the form arn:aws:iam::<account-id>:role/<role-name>. Copy it from that role’s summary page in the AWS IAM console; it is the role’s own ARN, not the principal user’s ARN named in the trust policy.
When you assume a role, two more optional fields shape the request, both tied to the role. The External ID must match the sts:ExternalId condition in the role’s trust policy exactly; the match is case-sensitive at AWS. It is the cross-account guard against a confused-deputy call, so where a role’s policy sets an External ID the assume fails without the matching value. The Session duration is the lifetime of each credential the engine mints, a whole number of seconds from 900 to 43200 (15 minutes to 12 hours), default 3600. The console requires a whole number in that range, and because the engine re-mints per run a short duration is safe.
An Azure Blob destination fills the same two boxes with a different kind of credential. It authenticates with the storage account name and one of that account’s access keys, not with an access key id and a secret access key, so the account name goes in the key id field and the access key goes in the secret field (buildDestinationInner, engine/src/dest/factory.ts). Copy the key exactly as the Azure portal shows it, which is standard base64 that the Shared Key signer decodes before signing with it (signAzureSharedKey, engine/src/dest/azure-sharedkey.ts). The account name must be the account in the endpoint host, because a Shared Key signature is scoped to one storage account and Azure answers a mismatch with an error naming neither half; the engine compares them itself and refuses the save when they disagree.
Shared Key is one of three Azure credential kinds downpipes accepts. A SAS token goes in the same secret box and is recognised by its structure; an Entra service principal also needs a tenant id and an application id, which the form asks for in a collapsed block below the credentials. The three are set out in full in choosing a destination. The IAM action table above is AWS vocabulary and has no Shared Key equivalent to scope against: a Shared Key carries the whole storage account rather than a named set of operations, which is the reason to keep the archive container in a storage account that holds nothing else.
Building the AssumeRole role in AWS
Under AssumeRole the access key you store is not a write key; it is a principal whose only job is to assume the role, and the temporary credentials do the writes. So you build an IAM role with two things. Its trust policy must let that principal assume it, meaning it trusts the principal user’s ARN for the sts:AssumeRole action. Where you set an External ID, it requires the matching sts:ExternalId condition. Its permissions policy must carry the same S3 access on the archive bucket as a plain key does, the object read, write, delete and list from the table above, because the assumed session is what writes each run.
Two settings have to line up or the assume is refused. The region on the destination must be the role’s real AWS region, not R2’s auto, because the engine signs the STS call for that region. And the role’s own Maximum session duration, which AWS defaults to one hour, must be at least the Session duration you set here. Otherwise AWS rejects a longer request.
CONFIG_WRAP_KEY and STS AssumeRole are both engine settings on your self-hosted deployment. For tamper resistance at the destination itself, the object-lock and WORM story is in immutability and attestation.
Creating an Object-Lock bucket for WORM
If you set a WORM (write-once, read-many) policy on a destination, the engine writes each object with an object-lock retention until date, and at save time it reads the bucket’s Object-Lock configuration to confirm the bucket actually enforces it. A policy on a bucket that was not created with Object-Lock is not ignored by the store, it is refused: both R2 and AWS S3 reject a write that carries retention headers when the bucket has no Object-Lock configuration, so such a destination could hold no archives at all.
Because that combination can never work, the console refuses to save it. Where the live probe establishes that the bucket cannot enforce Object-Lock, saving a destination that carries a WORM mode is rejected with a 400 and an error naming the bucket’s Object-Lock state, before anything is stored. It applies to editing an existing destination as well as adding a new one, and it fires only on a verdict the store itself gave: a bucket that answers “no Object-Lock configuration”, or a store that answers that it has no Object-Lock API at all. Where the probe simply could not read the configuration, for instance because the destination’s credential may write objects but not read the bucket’s lock settings, the save is allowed and the immutability posture check reports that enforcement could not be confirmed. Setting the mode back to off always saves, because a destination without a WORM policy carries no retention headers for the store to reject.
The catch is that S3 Object-Lock can only be enabled when a bucket is created; it cannot be turned on afterwards. On AWS the enable-Object-Lock control is in the Create bucket flow (under the advanced or object-ownership settings), so you choose it at creation. If an existing bucket does not have it, the fix is to create a new bucket with Object-Lock enabled and point the destination at that.
Cloudflare R2 cannot enforce S3 Object-Lock, on any bucket, so a WORM policy on an R2 destination is refused. R2’s S3 API does not implement the Object-Lock configuration calls, and its CreateBucket rejects the object-lock-enabled header, so there is no way to create an R2 bucket that enforces it and no way to add it later. A console-set R2 destination is reached over the S3-compatible endpoint and probed the same way as any other S3 destination. The probe reads back that the bucket does not enforce Object-Lock.
Saving a destination with a WORM mode set is refused on that readback with an explanatory error, before anything is stored, so you cannot end up with an R2 destination that accepts no writes. R2’s own bucket lock retention feature is a separate mechanism that this policy and this probe do not reach. If you need store-enforced WORM, use an AWS S3 bucket created with Object-Lock enabled. The full WORM model, including governance versus compliance mode, is in immutability and attestation.
An Azure Blob destination reaches the same two guarantees by a mechanism of its own. Azure has no S3 Object Lock, so the engine writes Azure’s version-level immutability instead: governance becomes an unlocked policy and compliance a locked one, sent as a request header on each blob rather than inferred from the container. The container or the storage account must already have version-level immutability enabled. The engine probes for that and refuses the save when it is absent, just as it does for an S3 bucket created without Object Lock. The console offers the immutability control for an Azure destination, and the destinations API sets the same policy. The mapping and its precondition are in choosing a destination, and the mechanism each provider offers is one row each in destination providers compared.
Addressing style and storage class
Two optional S3 settings shape how the engine writes to an S3-compatible destination. Both are location config, not secrets, and both have a safe default, so you set them only when your provider needs it.
Addressing style chooses how the bucket appears in the request URL. Leave it on auto and the engine uses virtual-hosted addressing for AWS S3 and path-style addressing everywhere else, which is what almost every provider wants. Set path or vhost explicitly only when your S3-compatible provider requires one style: some on-premises and older gateways need path (the bucket in the URL path), while a few require vhost (the bucket in the hostname).
Storage class picks the S3 storage tier each object is written to. The engine writes only to the immediately readable tiers, because a restore has to read an object back without a retrieval delay:
| Value | Use it for |
|---|---|
| Bucket default (blank) | The default in the form: the engine sends no storage-class header, so each object takes the bucket’s own default. |
STANDARD | General-purpose, read immediately. |
STANDARD_IA | Infrequently accessed data, still read immediately, lower storage cost. |
INTELLIGENT_TIERING | Let the provider move objects between tiers by access pattern. |
ONEZONE_IA | Infrequent access in a single availability zone, the lowest cost of the four. |
Archival tiers such as Glacier and Deep Archive are deliberately refused: an object there cannot be read back without a restore-from-archive step first, which would make a recovery drill or a real restore fail at the moment you need it. If your retention policy needs cold storage, use a bucket lifecycle rule to transition older objects after they are written, rather than writing them cold.
Neither setting is offered for a Google Cloud destination. Google Cloud Storage’s interop endpoint is always path-addressed, so there is nothing for the addressing style to choose, and Google’s storage classes have different names from Amazon’s. downpipes does not translate between the two vocabularies, so it refuses an Amazon class name for a Google endpoint rather than sending one that Google rejects on the wire. Set the class you want on the bucket itself in Google Cloud, or use a bucket lifecycle rule there, exactly as you would for a cold tier on S3.
Neither setting reaches an Azure Blob destination either, and the two are turned away differently. Azure’s request URL puts the container and the blob on the storage account’s own host in one fixed shape, so the addressing style has nothing to choose and the Azure client never reads it. The storage class is refused outright: Azure’s tiers are named Hot, Cool, Cold and Archive rather than Amazon’s storage-class names, downpipes does no translation between the two vocabularies, and an Amazon class name on an Azure endpoint is refused by name at save with the remedy attached (AZURE_REFUSED_FIELDS, engine/src/dest/provider.ts). Set the access tier on the container or the storage account in Azure. Choosing Azure Blob on the form hides both controls, so neither is offered for a destination that cannot honour them, and the submit does not send a value left behind by switching provider.
Validation and the removal guard
The engine bounds the configuration at its authority boundary, so a malformed or stale selection is refused rather than silently mishandled.
| Rule | Behaviour |
|---|---|
| Non-empty list of opaque ids, capped at 20 | destinationIds must be a non-empty array of at most 20 entries when present, and each id is an opaque string of 1 to 128 characters from a restricted character set. A list longer than 20 is rejected outright rather than truncated, so a downpipe never silently fans out to fewer destinations than you asked for (MAX_DESTINATIONS_PER_DOWNPIPE, engine/src/sched/config-validate.ts). |
| Live at save time | Each id must reference a destination that exists when you save. A pinned id that no longer resolves fails the run loudly rather than writing to the wrong bucket. |
| Removal is blocked while in use | Removing a destination that any downpipe still pins (as primary or as a replica) is refused. You are told which downpipes use it and asked to reassign them first. |
| Removal guard on the only proven copy | Removing a destination that is the only proven holder of some runs (for example a run sealed there under failover and has not replicated elsewhere yet) is refused unless you force it, so you do not orphan runs by accident. |
The endpoint cannot point inside your network
An S3-compatible destination takes an endpoint URL, and that field is the one place a destination could be aimed somewhere it has no business reaching. The engine screens the host before it does anything with it. An endpoint whose host is an internal, private, loopback or link-local address is refused with a 400 naming that reason. This includes the cloud metadata address that would otherwise be the interesting target.
The refusal happens before any request is made. It is checked ahead of the bucket and credential fields and ahead of the live write probe that verifies a destination, so nothing is stored, nothing is contacted, and a refused endpoint leaves no destination behind. The same message reaches you at the console form rather than only over the API.
The screen covers the spellings, not just the obvious one. Loopback, RFC1918 private ranges, carrier-grade
NAT, the this-host range, localhost and any .localhost name, IPv6 loopback, unique-local and link-local,
an internal IPv4 address smuggled in as an IPv4-mapped IPv6 literal, and the obfuscated decimal and
hexadecimal spellings of an IPv4 address that a URL parser collapses back to the same host.
From engine 0.3.6, when the engine first sends to a stored endpoint in a run, it also resolves the host name. It refuses the send if an answer is an internal address. This check comes after you save the destination. See webhook egress security for the race and for a resolver that does not answer.
One limit is worth knowing. The save-time screen checks the address as written. On engine 0.3.5 and earlier, nothing catches a hostname that looks ordinary and whose DNS resolves to an internal address. From engine 0.3.6 the send-time check catches it, but not a record that changes after the engine’s lookup. If you run split-horizon DNS, do not treat either screen as the thing standing between a mistyped endpoint and your internal network.
Why copies fill in after a run, not during it
This is the behaviour to expect and not be alarmed by. A run does not write to every destination at the same instant. It seals to one destination, that copy is verified at seal time, and only then does a separate scheduled pass copy the finalised run to the other destinations. The replication pass runs after the seal so that a replica copy never delays a backup, and it catches each destination up on its whole backlog of missing runs, not just the latest, so a run that landed while one destination was briefly down is still back-filled later.
The map’s “N of M copies” readout reflects this. Right after a run, a fan-out downpipe can legitimately show one of two copies, then move to two of two once replication catches up. The number is derived from proven outcomes: a destination counts as holding a run only when its recorded state matches the latest successful run id, never from a guess based on how stale the run looks. A destination the engine could not reach shows as down, and a reachable destination that is simply behind shows as catching up.
The “N of M copies” readout applies only to a downpipe with two or more destinations. A single-destination downpipe has no redundancy concept, so it shows no copy-count readout at all. This configuration gives you redundant copies and failover. It is not the same as 3-2-1 verified. See the 3-2-1 page for what the platform proves and what you attest.
Reading the Retention row
Every destination’s posture carries a Retention row, in the detail drawer a destination’s table row opens and on the deploy-time destination card. It answers one question at a glance: what did the most recent retention prune pass do against this destination’s bucket? The row is always there, so “is retention working” has a standing answer rather than a readout that appears only when something is wrong. The policy behind it, the keepRuns and keepDays bounds and the enforce gate, is covered in retention and pruning; this row is where you check that the policy you set there is doing something here.
| The row reads | What it means |
|---|---|
| No prune recorded. | The engine holds no prune record for this destination. That is all the row claims: it does not say retention has never run, only that no record exists. |
| applied | The last pass deleted superseded history here. The row shows how many objects it reclaimed and how long ago, with the exact time on hover. |
| nothing to prune | The last pass ran and found no run outside the retention window. Nothing needed deleting, and nothing was. |
| dry run | Retention enforcement is off, so passes plan deletions but delete nothing. This is the commonest real reason retention never seems to delete anything: the enforce gate is off by default. |
| deferred | The pass held off rather than risk a wrongful delete, and the row names why: a retained run could not be read, so deleting would be unsafe (the abstain invariant), or no run log was found on this bucket. |
| error | The last pass failed or did not finish its deletes. It may have deleted part of its plan first, and a later pass plans what is left. From engine 0.3.6 a delete the store refused with no lock holding the object, such as a missing delete permission, also reads here. |
| paused | The retention-carrying downpipes writing here are paused, so the pass left them alone. |
| deletes refused | The destination refused the last pass’s deletes, and a retention lock holds at least one of the refused objects. From engine 0.3.6 a refusal counts as a lock only when the object’s lock headers show a lock that holds, or when Azure’s refusal code names one. When the credential is also not allowed to delete, the row says so. |
When an earlier pass did delete here, a quiet “last reclaimed N objects” clause stays visible under a later outcome, so a stretch of nothing-to-prune passes or a week of deferrals never erases the answer to “when did it last actually reclaim”.
Two rules bound what the row will tell you.
The count is objects, never bytes. Reclaimed counts the objects removed: a superseded run’s tree objects plus the segments no retained run still references. The prune planner never reads an object’s body, so a byte figure does not exist for it, the same reason the dry-run plan reports counts rather than a byte total.
A delete-refusing destination never shows a reclaimed count. On a destination whose delete probe was refused, meaning its credential may not delete, the row never renders a reclaimed count, because a count there would claim deletions that credential cannot make.
That second rule is where object lock and retention meet, and the meeting reads as one posture, not two faults. On S3 a compliance-locked bucket does not refuse a prune delete: the delete adds a delete marker and the locked version stays. Backups keep landing and verifying, and the bytes stay until the lock’s window and your lifecycle rule let them go. From engine 0.3.6 the Retention row’s reclaimed count leaves those objects out, because their bytes are still in the bucket. The store enforces the immutability you asked for.
Neither is something to fix. The full model, including governance versus compliance mode, is in immutability and attestation. The retention side of the same trade is covered in when pruning cannot run at all.
Where this fits
What 3-2-1 actually proves
The verify-versus-attest breakdown, and why a fan-out configuration is redundant copies rather than verified 3-2-1.
How a run is captured
The end-to-end shape of a run: capture, seal to the first reachable destination, verify, then replicate.
Connect a source
Attach the source this downpipe captures, with no command line.
The topology
Where the engine, its scheduled pass, and your destinations sit in your own Cloudflare account.
Retention and pruning
The policy behind the Retention row: the two bounds, the enforce gate, and why a pass abstains rather than guess.
Last updated .